REPL: Read-eval-print loop for Quint
A REPL is a read-eval-print loop. A REPL is usually a good way to start learning a language. In Quint a REPL is also a good way to interact and understand a specification, and thus very helpful in designing and specifying systems (see Section 5 for an example how).
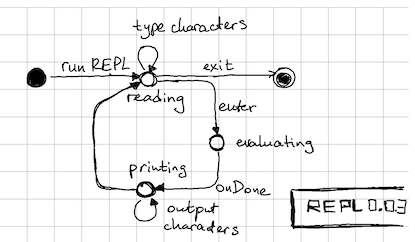
Most likely, you have seen a REPL before. If you had not, here is a simple state machine that describes how it works from the user’s point of view:
1. Installation
You have to install quint first. See Getting Started.
2. Running REPL
Simply run the following command in the terminal:
$ quintYou will see the following output:
Quint REPL vN.N.N
Type ".exit" to exit, or ".help" for more information
>>>
You can type .help and then press <ENTER> for supported REPL commands.
3. Preloading definitions
In this tutorial, we are interactively constructing the module kettle.qnt . You can load this file in the VSCode Plugin and read it, if you would like to have a better overview of the module that we are constructing. You can also load this file into REPL, if you only want to evaluate expressions without copying the definitions by hand:
$ quint -r kettle.qnt::kettleWhen you load kettle.qnt this way, REPL prints true indicating that the
module has been loaded successfully:
true
If you check the source of this markdown file, then you will see that it is written by following the principles of Literate programming , using the tool lmt . As a result, all definitions and the REPL session of this tutorial are automatically extracted from this file and checked with continuous integration. This approach may be useful to you, if you are writing your own protocol specifications in Markdown and like to connect it to Quint specifications.
4. Evaluating expressions
The core interaction with a REPL is to enter an expression and get back the result of its evaluation. Like this:
>>> 1 + 3
4
Or like this:
>>> Set(1, 2, 3).map(i => i * 2)
Set(2, 4, 6)
5. Writing definitions
In this tutorial, we are interactively constructing the module kettle.qnt that has the following structure:
// -*- mode: Bluespec; -*-
// The example from the REPL tutorial
module kettle {
<<<definitions>>>
}
We do not introduce this module in REPL, as REPL internally introduces an implicit module.
Whenever we write four leading spaces instead of >>> and ... , we
append the contents to the file kettle.qnt. For example:
    // an example of a definition
    val isThisMyFirstDefinition = true
Do not forget to copy the definitions in REPL, if you want to reproduce
the full REPL session without loading kettle.qnt.
4. Introducing values and definitions
Typing everything in a single expression can become tedious very quickly. To avoid that, you can introduce top-level definitions, which will be saved in the REPL context. For instance:
Let’s declare two immutable values:
    // a constant value that always returns 100
    val boilingTemperature = 100

    // a constant value that always returns 0
    val freezingTemperature = 0
And we’ll also define an operation to derive temperature in fahrenheit given a temperature in Celsius:
    // conversion from Celsius to Fahrenheit
    def fahrenheit(celsius) = celsius * 9 / 5 + 32
We can use the values and definitions in later expressions and declarations:
>>> fahrenheit(freezingTemperature)
32
>>> fahrenheit(boilingTemperature)
212
>>> 0.to(100).exists(celsius => fahrenheit(celsius) == celsius)
false
>>> (-100).to(100).exists(celsius => fahrenheit(celsius) == celsius)
true
We can also write new definitions by referring to the previously defined operators:
    // the low range of a thermometer (fixed)
    val veryCold = fahrenheit(-40)

    // the high range of a thermometer (fixed)
    val veryHot = fahrenheit(40)
This is how REPL evaluates the expressions that use the above definitions:
>>> veryCold
-40
>>> veryHot
104
Hint. At some point, you may want to copy & paste the above output back in
REPL. Try it. REPL is smart enough to recycle its own output. Be careful
though about not mixing the lines starting with '>>> ' or '... ' (which
decorate your input in REPL) with other lines (which indicate the REPL output).
If you do mix REPL input with REPL output, you may get syntax errors.
5. Describing a state machine
In its basic form, REPL allows us to evaluate expressions, which make it a great tool for learning the language. But REPL can do more for you: It can simulate a state machine. In this section, we interactively specify a model of an electric kettle:
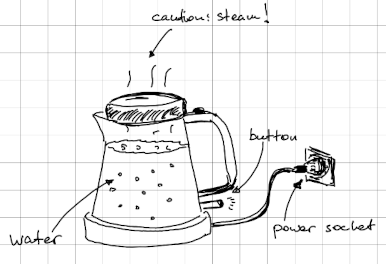
Informally, we can describe the most basic operation of a kettle like the one above with the following state machine :

If you think, “this diagram is not very realistic”, you are right. We will extend it later.
5.1. Introducing state variables
In addition to definitions and values, we also declare state variables:
    // the current temperature in the kettle
    var temperature: int

    // is the kettle currently heating?
    var heatingOn: bool

    // is the kettle currently beeping?
    var beeping: bool
By default, a state variable is not assigned any value and a reference to a declared but unassigned state variable will produce a runtime error:
>>> temperature
runtime error: error: [QNT502] Variable temperature is not set
    var temperature: int
    ^^^^^^^^^^^^^^^^^^^^

<undefined value>
5.2. Initializing state variables
Undefined state variables are not very useful. Hence, we have to introduce an action to initialize the state machine and move it forward. For instance, here is how we initialize our kettle:
    // a state initializer
    action init = all {
      temperature' = 20,
      heatingOn' = false,
      beeping' = false,
    }
The action init is just an action definition, which can be applied later. To
apply it, we simply type init:
>>> init
true
Note that REPL has evaluated this action to true. It means that the action
has taken place. If it was evaluated to false, it would mean that something
prevented the action from being applied; more on that later.
Now we can check that init has indeed initialized the state variables as
expected:
>>> temperature
20
>>> heatingOn
false
To make it easier to see how our state evolves, let’s also declare a value that collects all of our state variables in a single record:
    // a handy definition that captures the state in a record
    val kettleState = {
      heatingOn: heatingOn,
      beeping: beeping,
      temperature: temperature
    }
If we evaluate kettleState in the current state, we should get the following
output:
>>> kettleState
{ beeping: false, heatingOn: false, temperature: 20 }
5.3. Updating state variables with actions
Similar to how we introduced init, we introduce the action pressButton,
which turns on the heating element of our kettle.
    // turn on the heating element
    action pressButton = all {
      not(heatingOn),
      heatingOn' = true,
      beeping' = false,
      temperature' = temperature,
    }
Again, we have just defined the action pressButton, but that action
is not applied automatically. To apply it, we simply type its name:
>>> pressButton
true
We can check our state variables to make sure that the action indeed took place:
>>> kettleState
{ beeping: false, heatingOn: true, temperature: 20 }
The heat is on now!
Interestingly, if we try to apply pressButton once again, it would not
work, as indicated by the false result:
>>> pressButton
false
Indeed, we do not allow the button to be pressed again, if the heating is already on. In a physical kettle this is usually done mechanically, but in the abstract world of specs it is up to us, whether we allow for this behavior or not.
Similar to pressButton, we can define the failover action that turns off
the kettle when the temperature reaches 100. If the value 100 makes you
puzzled, call fahrenheit(100) in REPL ;-)
    // turn off the kettle when the temperature is too high
    action failover = all {
      heatingOn,
      temperature >= 100,
      heatingOn' = false,
      beeping' = true,
      temperature' = temperature,
    }
If we apply failover to the current state, it will not execute:
>>> failover
false
Indeed, temperature is equal to 20 in the current state of REPL:
>>> temperature
20
To properly test failover, we should probably define the action heat
in our spec. But since we are in REPL, we can also take a shortcut, by
simply setting the state variables to the state we need:
>>> all { temperature' = 100, heatingOn' = true, beeping' = false }
true
This tells the simulator to apply an anonymous action, advancing the state in
the way specified in the expression: It sets temperature to 100, heatingOn to
true, and beeping to false. (You can double check that by evaluating the
variables.) Note that not only we had to set the value of temperature, but
also the values of heatingOn and beeping. If we had not done that, the
values of heatingOn and beeping would have become undefined.
Now we can apply failover:
>>> failover
true
>>> heatingOn
false
>>> temperature
100
>>> beeping
true
To reset the state to the previous one, we can simply evaluate init and
pressButton again (there is a better way to do that, which we will show
later):
>>> init
true
>>> pressButton
true
>>> kettleState
{ beeping: false, heatingOn: true, temperature: 20 }
Now it is time to specify the action heat:
    // heat up the water by 1C
    action heat = all {
      heatingOn,
      temperature < 100,
      temperature' = temperature + 1,
      heatingOn' = true,
      beeping' = false,
    }
By applying heat several times, we can see that it heats up the kettle a bit:
>>> heat
true
>>> temperature
21
>>> heat
true
>>> temperature
22
>>> heat
true
>>> temperature
23
5.4. Introducing control non-determinism
So far, our specification of a kettle had only one action that turns the
heating element off, namely, the failover action. Normally, a kettle can be
turned off without waiting until it boils to 100C. Hence, we add one more
action depressButton in our diagram:

This action should be easy to define:
    // turn off the heating element
    action depressButton = all {
      heatingOn,
      heatingOn' = false,
      temperature' = temperature,
      beeping' = false,
    }
Now we can execute four actions and observe that we managed to heat the kettle by 1 degree and turn it off:
>>> init
true
>>> pressButton
true
>>> heat
true
>>> depressButton
true
>>> kettleState
{ beeping: false, heatingOn: false, temperature: 21 }
Notice that our specification allows for a new interesting behavior. Evaluate the following expressions:
>>> all { heatingOn' = true, temperature' = 100, beeping' = false }
true
>>> depressButton
true
>>> kettleState
{ beeping: false, heatingOn: false, temperature: 100 }
>>> all { heatingOn' = true, temperature' = 100, beeping' = false }
true
>>> failover
true
>>> kettleState
{ beeping: true, heatingOn: false, temperature: 100 }
As we can see, both depressButton and failover can apply when the
temperature reaches 100 and the heating is on. This makes sense in real life. If
the temperature sensor in your kettle has not registered 100 degrees yet, and
you depress the button, the heating element turns off. We do not want to
introduce unnecessary details about precise time measurements and the physical
processes in the kettle, so from our perspective both failover and
depressButton may happen at the same time.
You can ask the question, whether it makes any difference when depressButton
or failover are applied. Actually, it does: failover sets beeping to
true, whereas depressButton sets beeping to false. Where did you get a
beeping kettle from, Igor? Well, I bought a “smart” kettle, and nobody told me
that it would beep in the middle of the night, when I would like to make a cup
of tea. It’s all good, I bought a “not-so-smart” kettle that is not beeping.
How do we describe in the specification that one of the actions may apply,
whichever happens first, and we do not control which one? Quint has the operator
any to do exactly this:
>>> all { heatingOn' = true, temperature' = 100, beeping' = false }
true
>>> any {
...   depressButton,
...   failover,
... }
...
true
The REPL implementation chooses one of the enabled actions pseudo-randomly. But
in general, the language does not prescribe one way of choosing between
simultaneously enabled actions. So we prefer saying that Quint evaluates any { ... } non-deterministically. To be precise, any { ... } describes control
non-determinism, that is, it chooses how to continue the flow, but each of our
actions behaves like a deterministic program. We will introduce
data non-determinism in the next section.
Now it is time to define all possible transitions of the kettle in one place:
    // one step of the state machine
    action step = any {
      pressButton,
      heat,
      depressButton,
      failover,
    }
Having defined step, we can conveniently execute steps without specifying
the action that should be executed next:
>>> init
true
>>> step
true
>>> step
true
>>> step
true
>>> step
true
If we print the current state after executing four steps, we will see that the state is different from the initial one:
>>> kettleState
{ heatingOn: true, beeping: false, temperature: 21 }
Note: your REPL session may end up in a different state, due to randomness
of nondet in REPL.
Exercise. Figure out how REPL ended up in the above state.
At some point, you may want to save particular sequences of actions. To see how to do it, read about Runs.
5.5. Introducing data non-determinism
If we look back at how we computed the initial state of our kettle, its temperature is always set to 20 (Celsius). Most likely, you are using your kettle under different temperatures too. Let’s update the state diagram, to reflect the reality a bit better:

I never tried to melt ice with an electric kettle, but it should probably work as expected?
It looks like we have to describe multiple possible initial states that differ in temperature. This is how we can do that in Quint, specifying that the temperature should be somewhere in the range of -40 to 40 degrees:
    // initialize the state machine with non-determinism
    action initNondet = all {
      heatingOn' = false,
      nondet temp = oneOf((-40).to(40))
      temperature' = temp,
      beeping' = false,
    }
Let’s see how it works. Execute initNondet for the first time:
>>> initNondet
true
Here is an example of a state that we may get into:
>>> kettleState
{ heatingOn: false, beeping: false, temperature: -27 }
If we execute initNondet more, we obtain different states. Try it:
>>> initNondet
true
>>> kettleState
{ heatingOn: false, beeping: false, temperature: -40 }
>>> initNondet
true
>>> kettleState
{ heatingOn: false, beeping: false, temperature: 26 }
As you can see, initNondet does what we wanted: It chooses the initial
temperature from the interval [-40, 40] and sets heatingOn and
beeping to false. The magic is done by the special syntax form of Quint
that looks like follows:
    nondet myElem = mySet.oneOf()
    expr
REPL randomly picks one of the elements from the set mySet and binds the name
myElem to the chosen value. The name myElem can be used inside the expression
expr, which usually contains an assignment. Whereas the Quint simulator used in
the REPL chooses a set element pseudo-randomly, other implementations may
handle non-determinism differently. That is why we say that the nondet-form
specifies data non-determinism.
6. Saving and loading the REPL session
At this point, we have introduced a lot of definitions. It would be great to save them somewhere, so we do not have to type them again, if we accidentally close the REPL.
You can save the REPL session with the builtin command .save:
>>> .save kettle.qnt
Session saved to: kettle.qnt
This command saves all definitions and evaluated expressions in a file. You can edit this file in your editor of choice and load it back to REPL:
>>> .clear
>>> .load kettle.qnt
Note that if you start with a non-empty session, it’s better to clear it with
the command .clear before loading the session from the file. Otherwise, REPL
may complain about conflicting definitions. If you want to combine definitions
from several files, you can execute several .load commands without .clear
between them.
If you tried to save and load your REPL sessions, you might have noticed that
the .load command replayed all the expressions you have typed so far.
In the current version, the expressions are saved inside comments, e.g.:
/*! (heatingOn, temperature, beeping) !*/So if you do not want REPL to execute the previously typed expressions, you can just remove them from the file. As a note, the format may change in the future.
7. Further reading
We have not covered all REPL features in this tutorial. For example, you can execute concrete and randomized runs, as well as randomized tests. To see these features, check Tutorial 3.